 |
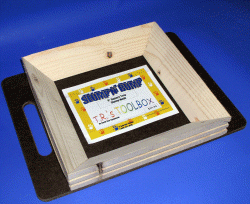
Slump N' Bump
|
| |
Item No.
Slump N' Bump |
Description
6" Square Bottom Edge
8 3/4" Square Top Edge
1 1/2 In. Deep |
Price
$24.99 |
Weight &
No. of Ctns
5 |
|
|
| (Slump N' Bump) |
Key Benefits
- Lots Of Fun For Classroom Students
- Industrial Strength Rubber Bands
- Quick Removal From Finished Piece
|
 |
|
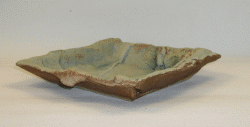
Jim Robison Tray (Made w/ Slump
N' bump) |
Assembly:
Remove rubber bands and reserve. Lay wooden frame pieces together on a flat
surface, with slotted edges on the outside. Use both rubber bands to hold frame
pieces together, making sure rubber bands are seated in slots. Set mold on top
of handled bat. Bat and mold remain separate pieces in operation.
Using your slump mold:
Roll out a medium-thick slab and rough cut it to size with a fettling knife. Lay
the slab onto the top of the tray mold (no need to fit it down into the mold).
Now using the handled bat for initial support pick up the entire unit and from
about waist height let drop onto floor; clay will settle into and fill the mold
when it hits the floor. Set entire thing aside to stiffen up. Once clay is
leather hard mold and bat can be removed for another use.
Tips and Tricks:
Texture the slab prior to putting into mold. Reverse the slab after texturing
for a textured exterior. Carve designs in tray when leather hard. Add feet or
handles. Carve the top tray edges. Paint slip onto slab before forming tray for
cool altered designs. Cut the slab slightly larger than usual for cool edge
effects. Cut the slab smaller for shallow trays. Cut away the bottom of the
leather-hard tray for a cool picture frame.
|